


5 Easy Steps to HTML Import Content into WordPress
- 1. Installing WordPress and the HTML Import plugin
- 2. Setting file parameters
- 3. Setting the content parameters
- 4. Setting the header and metadata parameters
- 5. Importing files
If you need to transfer an HTML site to WordPress, there are two main methods you can use: manual transfer or using a plugin. While the manual transfer can be time-consuming and tedious, opting for a plugin can make the process quicker and easier. In this article, we will focus on importing HTML content into WordPress using a plugin, specifically the HTML Import 2 plugin. Let’s get started and learn how to import HTML content into WordPress in just five simple steps.
1. Installing WordPress and the HTML Import plugin
Before you can begin the import process, you first need to have WordPress installed on your system. Most hosting providers offer a simple one-click installation for WordPress, making it convenient to set up. Once you have WordPress installed, access the WordPress admin panel and navigate to the “Plugins” section. Look for the HTML Import 2 plugin, install it, and activate it.
2. Setting file parameters
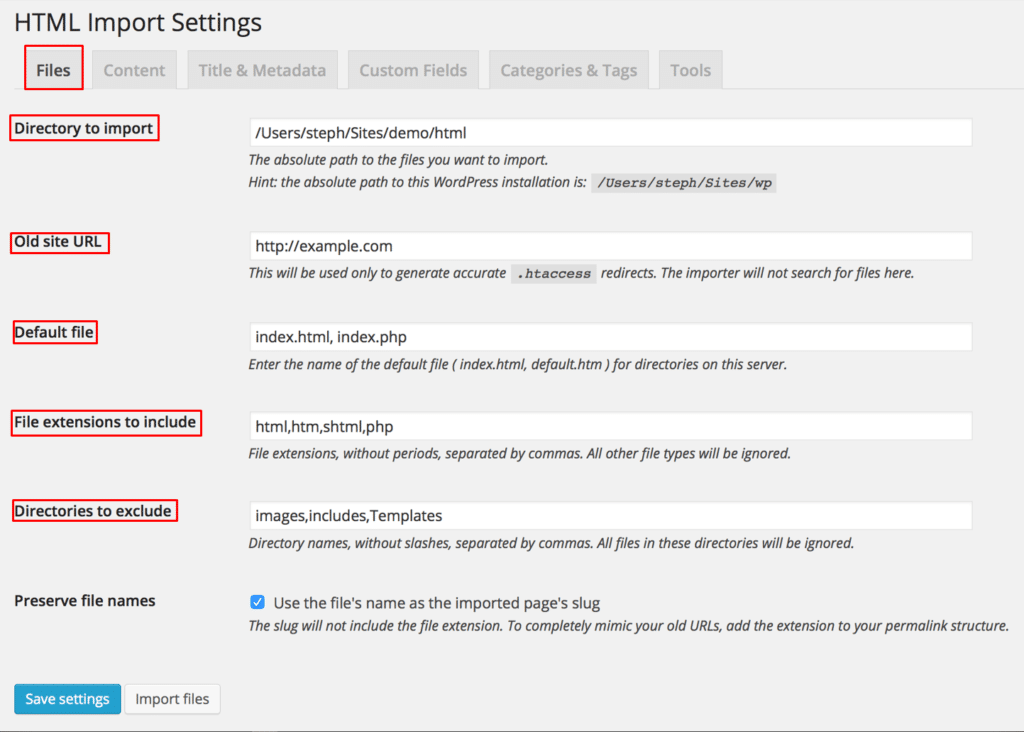
After activating the HTML Import 2 plugin, you can proceed to configure the necessary file parameters. In the plugin settings, select the “Files” tab. Here, you will find several options that need to be set:
- Directory for import: Specify the absolute path to the file you want to import. Make sure to double-check the displayed directory to ensure its accuracy.
- Old site URLs: This field is required for the importer tool to create accurate .htaccess redirects. Enter the link that corresponds to the home directory of the old site. The tool will not use this link to search for files to transfer.
- Default file: Write the name of the default index file for directories. Typically, Apache servers use “index.html” as the default file. If you have multiple default files, separate them using commas.
- File extensions to include: Specify the file types that you want to transfer to the new WordPress interface. Separate each extension using commas, without using periods. For example, “html, htm, shtml”.
- Catalogs to exclude: If there are any directories that you don’t want to import, enter their names here, separated by commas and without slashes. For example, “images, templates, inclusions”.
3. Setting the content parameters
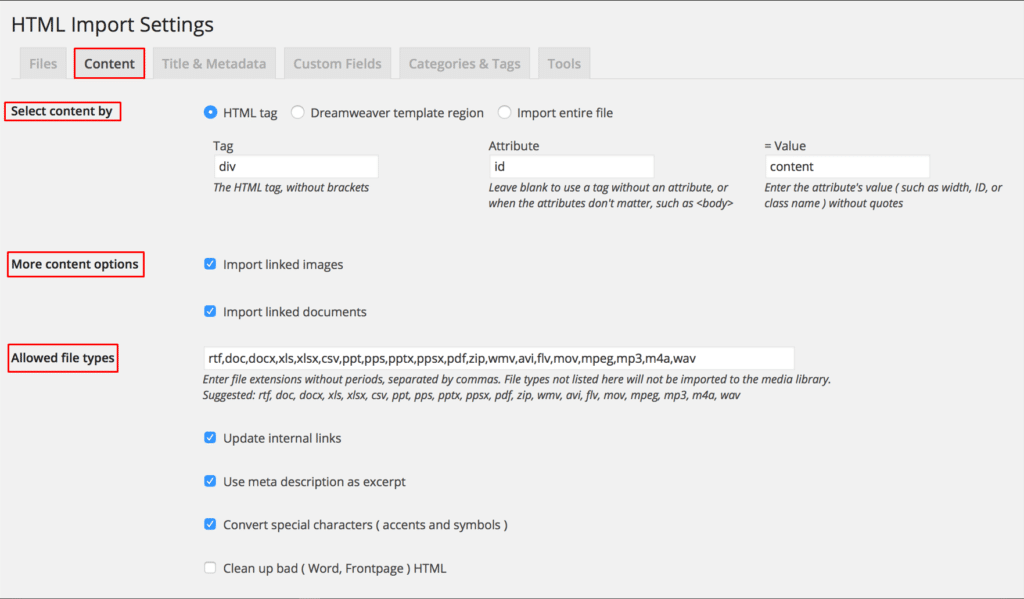
To ensure the proper import of content, you need to configure the content parameters. Go to the “Content” tab in the plugin settings. In the “Select content” section, turn on the switch for HTML. Below that, in the “Tag” field, enter the name of the HTML tag without brackets. If there are any attributes associated with the tag, fill in the corresponding attribute fields and their values. Additionally, you have the option to import related images to the WordPress media library. Enable the “Import related images” checkbox in the “Additional content” options. If you want to transfer other types of documents like PDF or Word files, you can specify the allowed file types in the respective field.
4. Setting the header and metadata parameters
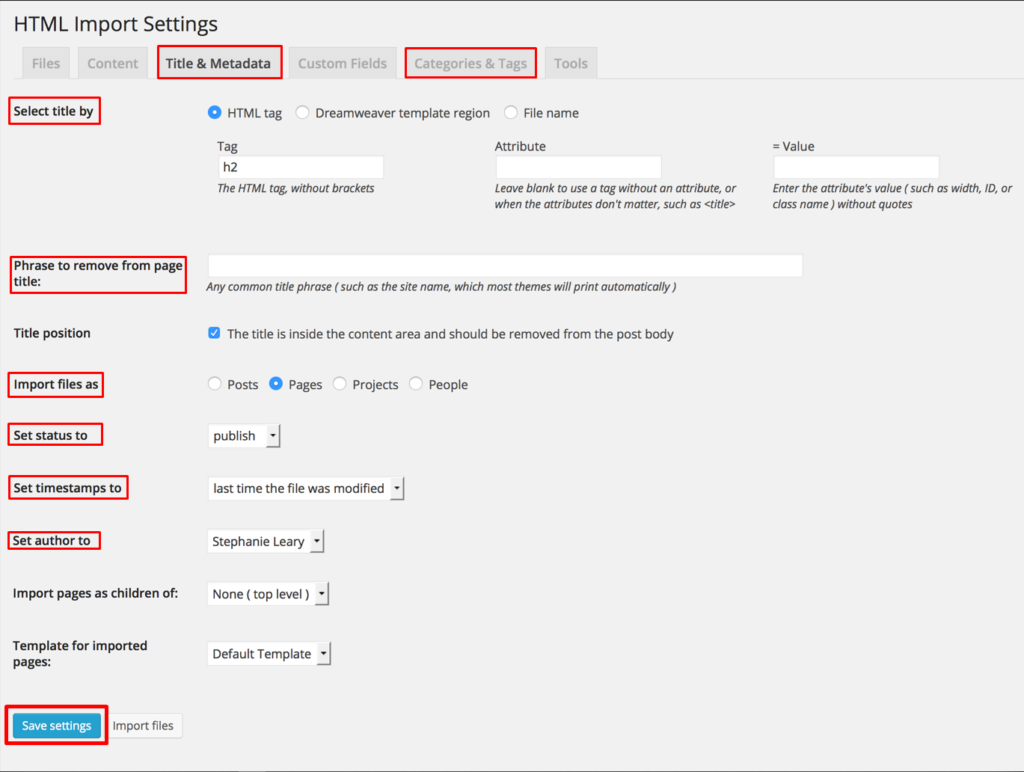
Proceed to the “Name and Metadata” tab in the plugin settings to configure the header and metadata parameters. Here, you can choose the title tag in a similar way to the previous step. Depending on the WordPress theme you’re using, the site title might automatically be added to all posts and pages. If it’s already included in the <title> tag, you need to remove it to avoid duplication. In this section, you can also define other metadata parameters, such as the method of importing files, status, time stamps, and authors. To assign categories and tags to the transferred files, open the “Categories and Tags” tab and make the appropriate selections.
5. Importing files
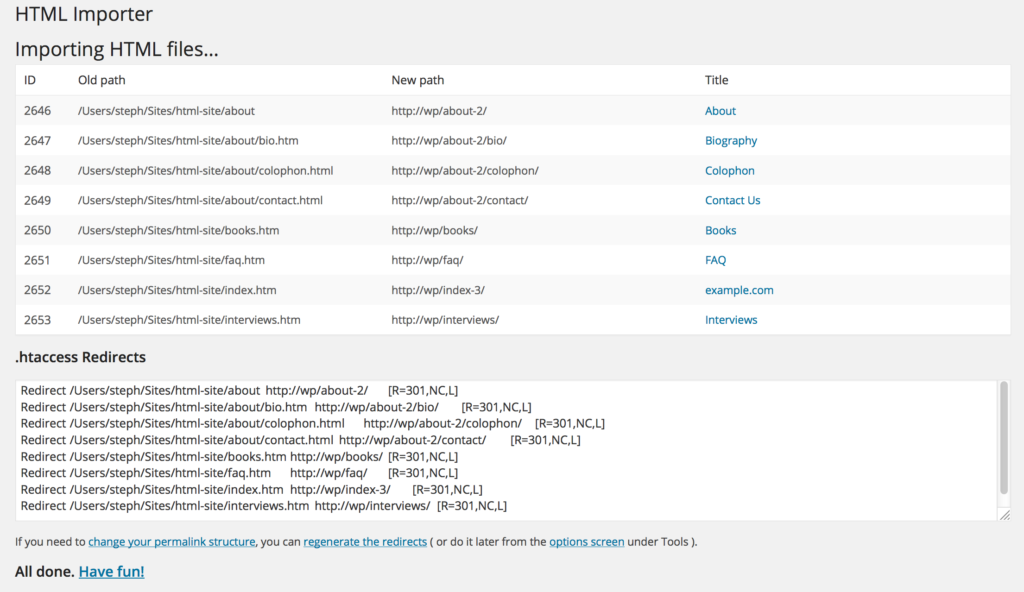
After you have configured all the necessary parameters, save the settings using the blue button at the bottom of the screen. Once saved, click on the “Import files” tab to initiate the import process. The plugin will start transferring the HTML files and associated content to your WordPress site. During the migration process, you will see a status report that provides information about any errors encountered. Review the report carefully and make the necessary changes to ensure a successful import.
In conclusion, importing HTML content into WordPress can be a seamless process with the help of the HTML Import 2 plugin. By following these five steps, you can efficiently transfer your HTML site to WordPress while preserving the content, structure, and metadata. Say goodbye to manual and time-consuming transfers, and embrace the convenience and speed of using a plugin like HTML Import 2.
Ordering development from HUTKO agency brings numerous advantages to businesses seeking high-quality WordPress development in NY. With their expertise, client-centered approach, competitive pricing, and commitment to excellence, HUTKO agency is a reliable partner for creating websites that make a lasting impression. Take the first step towards enhancing your online presence and driving business growth by choosing HUTKO.

Free website strategy session with a senior web expert
For over a decade, we’ve helped startups, SaaS companies, and service brands build high-performing websites that drive real results. Whether you’re planning a redesign, launching a new product, or need to scale your platform—our technical and UX expertise can help you move faster and smarter.
Ready to talk? Connect with a lead developer at Hutko.dev for a FREE 30-minute strategy call. Let’s map out your next step, together.
Book a Free Call